Designing and installing whole-house audio systems can be a good fit for an alarm company because the skill sets required for both types of installations are quite similar. But in order to do quality work, technicians should recognize that whole-house audio, like security, is a constantly changing field that requires a continuous learning process. In this article,SDMoffers tips for obtaining the most successful whole-house audio installations.

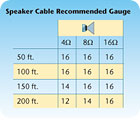
To select the right gauge speaker wire, technicians must consider distance and speaker impedance (measured in ohms).
WIRE LIKE A GENIUS
Many customers make the decision to purchase a whole-house audio system at the time they have a new home constructed, which can simplify the process of pre-wiring a home immensely, as wires can be installed while the walls are open. Also, if a job calls for in-wall speakers, technicians can simplify the installation process by using rough-in brackets, notes Kelly Driscoll, president of Audio Design Innovations, a Stillwater, Minn.-based audio design and installation company. “It costs from $3 to $10 for a pair of rough-in brackets, but you save money by not having to cut holes in the sheet rock,†Driscoll says. Instead, the people who install the sheet rock will cut the holes when they do their installation.Retrofit installations can be more challenging because installers have to cut holes in the drywall for fishing the wiring and for any in-wall speakers. Installers should proceed cautiously in that situation, advises Eric Lee, a trainer for Indianapolis-based Custom Electronics Design and Installation Association (CEDIA). Lee advises installers to drill a three-quarter inch hole, poke a coat hanger through the hole and bend and twist the hanger around to make sure there are no other obstructions before cutting a bigger hole. He tells technicians not to refer to a coat hanger by its actual name, however. “We call it a CH27,†he says. “It sounds more professional.†(CH is an abbreviation for coat hanger, and the 27 refers to its length, notes Lee, adding that installers also may need a longer CH47 version.)
Whether an installation involves new construction or retrofit, proper wire installation is critical and can make or break an entire system. Driscoll advises installers to get in after the electricians and to take care not to run any audio wiring parallel to electrical wiring. “The system can pick up noise from their wires,†he explains, “and when you cross their wires, you want to be at a 90-degree angle.†This advice is most critical with the speaker wires used in the system, but also applies to the Category 5 or other wiring used to connect the master controller with keypads throughout a home.
Installers should anticipate future needs as they wire a home for an audio system. Adding extra unused wires today can eliminate the need to run wires again if customers expand their systems in the future. “There’s no such thing as running too much wire,†quips Kevin Fitzpatrick, program coordinator for training, education and certification (TEC) at audio equipment manufacturer Russound SMP Inc. of Newmarket, N.H.
Where and how wire is run also can simplify future expansion. “The most important thing is to home run the wiring and never daisy chain,†notes Ron DeMille, TEC manager for Russound. “If everything is home run, it leaves the door open for whatever may need to be done. Having speakers home run back to the control enables the ability to have separate zones.†By having separate zones, homeowners can control the audio in individual rooms, or zones, separately from other areas of the home.
Running control wires to a place where a customer might want to add an extra keypad later is also a good idea, advises David Baldwin, installation manager for Audio Consultants, an Evanston, Ill.-based audio design and installation company.
SPEAKING OF SPEAKERS
The type of speaker used and speaker placement can have a great impact on the quality of the sound provided by a whole-house audio system. “If speakers are not built into the wall, they generally sound better,†Baldwin advises. “When they’re in the wall, extra resonance is uncontrolled and unknown by the designer.â€Some customers are willing to forego a certain measure of acoustic quality in order to eliminate speaker boxes in their home, however. For customers such as those, Baldwin advises using wall-mounted, rather than ceiling-mounted, speakers. “Any speaker sounds best when it’s pointed at you,†Baldwin advises.
Ensuring that speakers are pointed right at listeners in a living room may be a straightforward decision. But, as Driscoll points out, the same is not true in every room. “On a deck outside, people may be moving around,†he notes, adding that determining where to put the dual speakers used for stereo installations can be particularly challenging. For such locations, Driscoll recommends using mono-amplifier or dual voice coil speakers. Such speakers may have two tweeters built into a single speaker to provide a stereo effect. “You may still hear a bit of stereo effect if you’re right in front of the speaker,†Driscoll explains. “But no matter where you’re standing, you’ll get the full amount of music.â€
Terry Dennelly, audio product manager for speaker manufacturer Speco Technologies of Amityville, N.Y., points out another challenge in installing speakers outdoors. “Outdoor acoustics are different from indoor acoustics in regard to the challenge of getting quality sound in open spaces. This can be done with higher-power-rated speakers, and/or a higher concentration of speakers or speakers with good base response.â€
KEYPADS & REMOTE CONTROLS: AS FRIENDLY AS POSSIBLE
Often customers’ main point of contact with their audio system is through wall-mounted keypads or touch-screens and through wireless remote controls — and careful selection and placement of these devices can have a big impact on each customer’s overall satisfaction with the system.DeMille cautions against installing keypads at the same height as light switches. “An interior designer may love it. But imagine the end user having to control something and having to bend over to read it. Any interface requiring time in front of it should be at thermostat height — 59 inches up from the floor.â€
Keypads often have infrared receivers built into them, which are designed to work with a wireless remote control. Unfortunately, the built-in infrared receivers also can be sensitive to other forms of infrared energy, notes Walt Zerbe, audio product manager for audio equipment manufacturer OnQ/ Legrand of Middletown, Pa. “Don’t place keypads near windows or sliding doors or glass and don’t place them directly beneath lighting in a room,†he says. Plasma-screen televisions also can be problematic. “They can produce amazing amounts of infrared that can bring the infrared system down.†Installers should familiarize themselves with the infrared receivers in different types of keypads, he advises. “Some are plasma-friendly,†he says.
When providing customers with remote controls, installing companies also should realize that customers’ natural inclination is to aim the remote at whatever device they want to control. That can be problematic if, for example, the logical place for the keypad is right next to a bedroom door so the user can turn the system on upon entering the room. But once the homeowner goes to bed, he may want to use the remote to control a television at the foot of the bed. To address this, installers can place an infrared receiver at the television that will communicate with a tiny emitter at the keypad, essentially acting as an infrared wireless repeater and directing the infrared command to the keypad.
DeMille offers a tip for making such a solution as unobtrusive as possible: Install the emitter inside the keypad. To do that, he says, installers will need to remove the black casing that typically surrounds the emitter, wrap the emitter in transparent foam and tuck it inside the keypad in close proximity to the receiver.
BY THE WAY…
Other elements that are sometimes included in today’s whole-house audio systems are media servers and storage units, which are essentially computer-like devices that enable digital music to be stored and managed from a single source, eliminating the need to keep track of multiple CDs. Perhaps the biggest decision involving such components is to determine the correct storage size, measured in gigabytes. Once a storage device is full, it cannot be expanded. Instead, contents have to be copied onto a newer larger device or an additional storage unit must be added, requiring users to keep track of where they have stored each individual musical selection.Useful Resources
The Consumer Electronics Association (Arlington, Va.) offers several publications with detailed information about how to install whole-house audio systems. Walt Zerbe, audio product manager for On-Q / Legrand, chaired the committee that recently completed the CEA2030 standard for multi-room audio wiring. The goal of the standard, he says, was to enable installers to wire a home to accommodate 99 percent of all systems on the market. At press time, the CEA was close to finalizing another standard focusing on speaker installation.Additional information about the CEA2030 standard and how to purchase a copy of it can be found on the CEA Web site at:www.ce.org/Standards/StandardDetails.aspx?Id=2039&number=CEA-2030
Another valuable resource is the Custom Electronics Design and Installation Association (CEDIA), which offers training on a wide range of home-audio topics at an annual expo and in classes nationwide throughout the year. The organization offers tracks focusing on technicians, designers, product managers, business and customer relations. More information can be found at:www.cedia.net
Links
- CEA2030 standard
- CEA2030 standard
- CEA2030 standard
- CEA2030 standard
- Custom Electronics Design and Installation Association (CEDIA)
- Custom Electronics Design and Installation Association (CEDIA)
- Custom Electronics Design and Installation Association (CEDIA)
- Custom Electronics Design and Installation Association (CEDIA)


